Recently, while working on a project to spin up a server running a few different Docker services as part of a Prometheus stack, I ran into an issue that left me, a network engineer, and another SysAdmin dumbfounded for a few hours. The issue was asymmetric routing.
Asymmetric routing, in simple terms, is when network traffic comes in a different interface than it goes out. To demonstrate, consider this architecture:
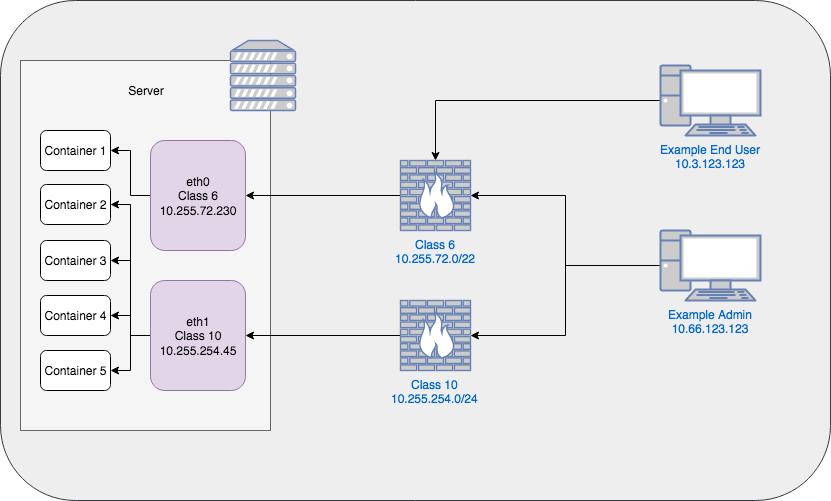
Is This Happening to Me?
In this example architecture, asymmetric routing would occur when a packet comes in to eth0 but tries to leave via eth1. In my environment, the network that the majority of end users are on does not have access to the server VLAN, which firewall class 10 is a part of. So they will try to access Container 1 that is connected to eth0 's network (on class 6), which they should have access to. However, if the host's default route (more on this later) is configured to use eth1 's network, then the traffic coming in eth0 will try to go out of eth1 and will be unable to route back to the end user.

The opposite is also true. If the host is configured to use eth0 's network as the default and an admin tries to access services running on Container 3 connected to eth1's network, the traffic will come in via eth1 and attempt to go out via eth0, where the packets will be dropped since eth0 's network never allowed a connection to the host from the Admin's PC (since it was eth1's network that allowed the inbound connection and is awaiting a response).
An easy way to test this is by using a ping test. If eth0 's network is the default route, attempt to ping eth1's IP address. It won't work. It will reach the last hop before the server but then never receive a response back. This is because eth1's network is awaiting a response from the server, but the server tried to send the response to eth0 's network.
Note: Asymmetric routing is fairly normal and would not be much of a user-impactful issue if both interfaces were on the same network, or both networks had equivalent firewall rules
But How Do I Fix It?
In order to solve the problem of asymmetric routing, we have to force our server to symmetrically route the traffic. Unfortunately, this isn't as easy as just flipping a switch and being done with it. To specify where traffic should go out based upon where it came in, we need to set up what is known as Policy Based Routing.
Policy based routing, for our purposes, means "route traffic based on policy I write rather than your default behavior". The way that Linux accomplishes this is through the use of multiple routing tables.
Before getting too far into this, I want to note that all of these commands were run on RHEL7 hosts, so your-mileage-may-vary on other distros. With that in mind, if you open up your console right now and type ip route, chances are the output will look something like this:
$ ip route
default via 10.255.254.1 dev eth0 proto static metric 100
default via 10.255.72.1 dev eth1 proto static metric 101
10.255.72.0/22 dev eth1 proto kernel scope link src 10.255.72.230 metric 101
10.255.254.0/24 dev eth0 proto kernel scope link src 10.255.254.45 metric 100
This is showing you the primary routing table for your Linux host. By default, any traffic that comes in or out looks at this table to determine where it should be going. However, there's a problem: there's two default routes specified. Yet, since the first line has a lower "metric", it is the preferred default route of the host. This causes the issues described above where traffic coming in eth1 is going out eth0.
Since there is no way to have two default routes for a single routing table (that kind of defeats the purpose of the default route bit), we need to create additional routing tables.
We don't necessarily need to do this next step, but it's a nicety and makes things easier to understand later so we'll do it. We need to add the new routing tables to /etc/iproute2/rt_tables. To do this, we'll just append them to the end of the file using our editor of choice, vi.
The file should be fairly short, so just append the values you want which, in my case, are two tables admin and users (numbered 1 and 2, respectively), since one Ethernet device is for user traffic and one is for admin traffic.
#
# reserved values
#
255     local
254     main
253     default
0       unspec
#
# local
#
#1      inr.ruhep
1 admin
2 users
Write the file contents out and quit your editor and now you'll have two empty routing tables. You can verify they exist by running
ip route show table admin
(substituting "admin" for whatever you named yours) and it should print nothing. If the table doesn't exist, you'll get an error message like so:
$ ip route show table blah
Error: argument "blah" is wrong: table id value is invalid
The tables are nice and all, but they're not much use without any routing rules in them. To add a routing rule, we utilize the ip route command again, but this time we specify to add a rule to a table.
# Add the network associations to the table
# Use CIDR notation to specify the whole network
sudo ip route add 10.255.254.0/24 dev eth0 table admin
sudo ip route add 10.255.72.0/22 dev eth1 table users

# Add the default route for each table
sudo ip route add default via 10.255.254.1 dev eth0 table admin
sudo ip route add default via 10.255.72.1 dev eth 1 table users
These commands do two things:
- They add routes for the directly connected networks (since traffic on the same network doesn't need to hit a router (i.e. default gateway))
- Adds separate default routes for traffic routed to each table
With these routing tables established, now we need to actually write the rules that send the traffic to them for processing. This is done with the ip rule command. You can see your current rules by running ip rule show. To add the new ones, we'll do the following:
# All traffic received on the IP and/or interface associated
# with the admin network, should be sent to admin
# routing table for processing (iif = incoming interface)
sudo ip rule add from 10.255.254.45 lookup admin
sudo ip rule add from all iif eth0 lookup admin

# Same goes for the users network
sudo ip rule add from 10.255.72.230 lookup users
sudo ip rule add from all iif eth1 lookup users
This should be all that you need to do in order to make the traffic work. Pinging both IPs should work now and if you have an HTTP service listening on one IP and another listening on the other IP, you should be able to hit them both independently.
Please note, however, that these rules will not persist across reboots. In order to do that in RHEL7, you need to install the NetworkManager-dispatcher-routing-rules package and create new scripts in the /etc/sysconfig/network-scripts/ directory. More information on that can be found here, but it is essentially just taking what we did here and putting the commands into network scripts that will run at boot time.